After looking at all my previous sketches, I decided to layout a timeline of things to do and in what order. This began with making more sketches, this time based on specific objects and characters that would be included, as the last sketch was more focused on being a rough overall draft. These would then be translated across into Blender and Zbrush. Once all the models were made, they would then be put together in one landscape.
Once finished, they would be sent over to Openbrush. This would result in effects to be included, giving life to the area. Once finished, a video would be recorded of a look and walk around of the area in Openbrush. However, if Openbrush did not work, then a video would be made with Blenders 360 camera.
I decided against using Maya in this project as not only was it very similar to Blender in functionality but using it outside of university meant incurring costs which I could not afford. On the other hand, Blender is a program that anyone can download free of charge.
Sketch Phase
In my original sketch, I had the idea of including a few chracters around my area to showcase a wide variety of skill. However, it did not include any actual characters, only a substitute for an actual design. So to begin these new sketches, I decided to make a character design that would translate across to 3D.
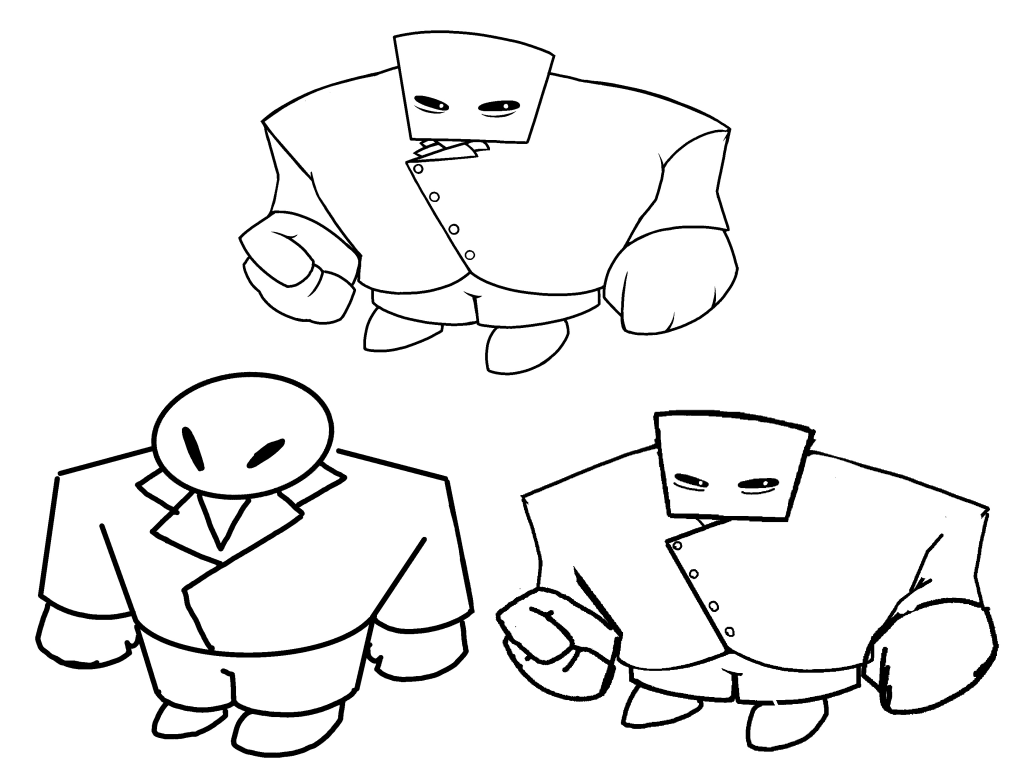
After a few sketches, I created this character. I made sure that the body and limbs could easily be recreated with simple shapes. It led to a very bulky design with very few small details. While a more realistic and complex character design could be made, I decided against it as there were many models to be made, and something too complex would steal time away from other important areas.
Two colour schemes were picked as I believe both work with the character design used. Having multiple options for colour schemes would help when making the model in Blender, as some colours may not be the greatest in certain lighting.
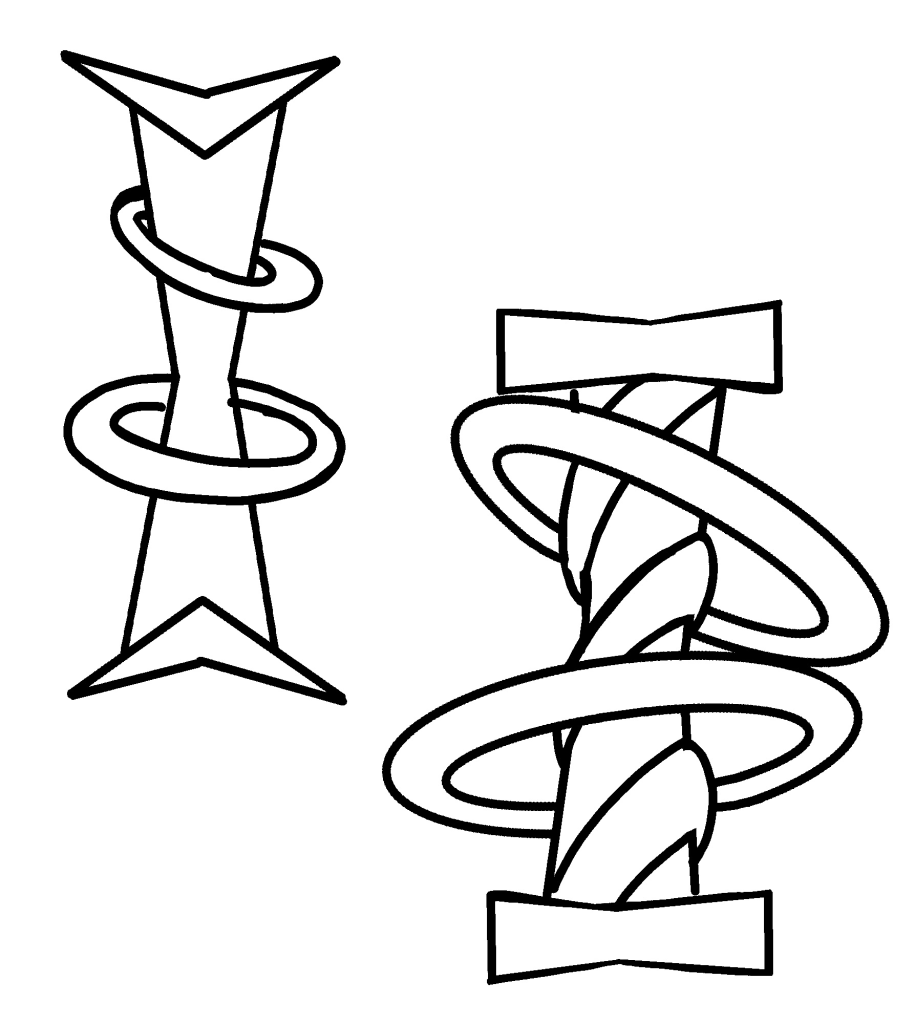
When creating the pillar sketches, I brought across the ideas of rings around a pillar from the previous sketches. From there, I wanted to expand on that idea by making the pillar itself more interesting, compared to a simple cylinder shape that it was. I believed this would display my knowledge of 3D modelling more effectively. The design itself is heavily inspired by multiple game series that I have played. The designs used have always impressed me and have been a source of fascination as they add whimsy and mystery to areas when included.
I chose colours that I thought would stand out from the rings, while retaining a sense of mystery. The colour purple is often associated with mystery and the unknown, more specifically with the spirtual world. To quote author Peta-Ann Wood, “Many cultures see purple as a bridge between the physical and spiritual worlds.” and “It’s a colour that embodies transformation, creativity, and imagination.” Blue contrasts well with the purple, blending into a design that is aesthetically pleasing.
Blender Models
Once I had created the sketches, Blender was then used to bring life to them. The character model was chosen first as it was one of the more intricate models that needed to be made.
All of the body and parts were made from heavily editing shapes into parts that look similar to the sketch. The head was the easiest part to make, along with the chest, simply being two squares. I selected the points on said squares and resized them to fit the build of the character. While the legs and hands also started as a simple square, they needed a lot more editing to match the sketch.

The hardest of the limbs to make was the arms. It required two squares, both heavily edited. Overall, they ended up quite good, but could be made less polygonal or natural looking in Zbrush or using the sculpting tool in Blender. Afterwards, a tie was added, which was not in the initial sketches, as I believed it would make the body more recogniseable as a suit. Lastly, shoes were made by taking a circle, deleting the points on the bottom half, and then filling in the empty gap.
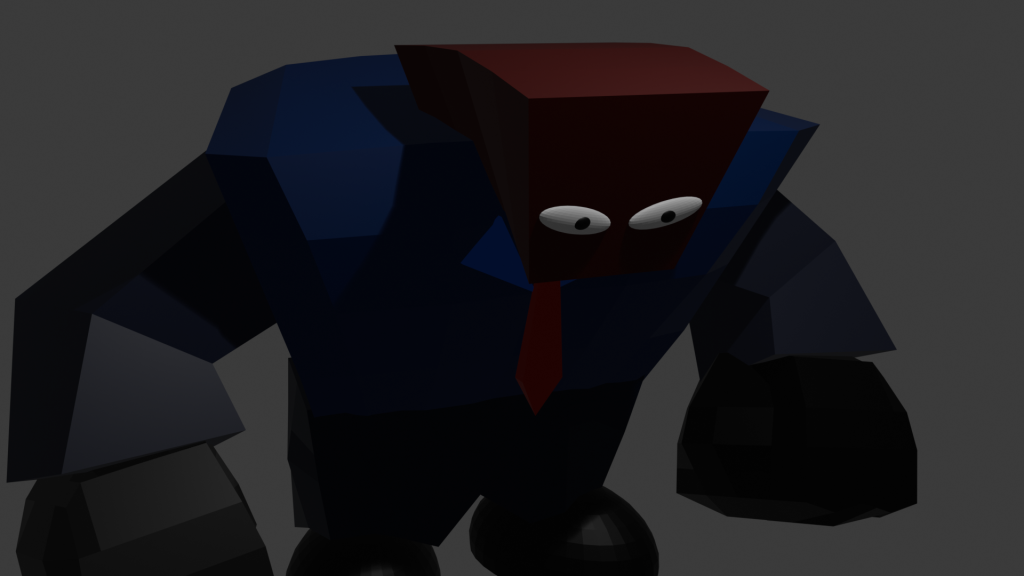
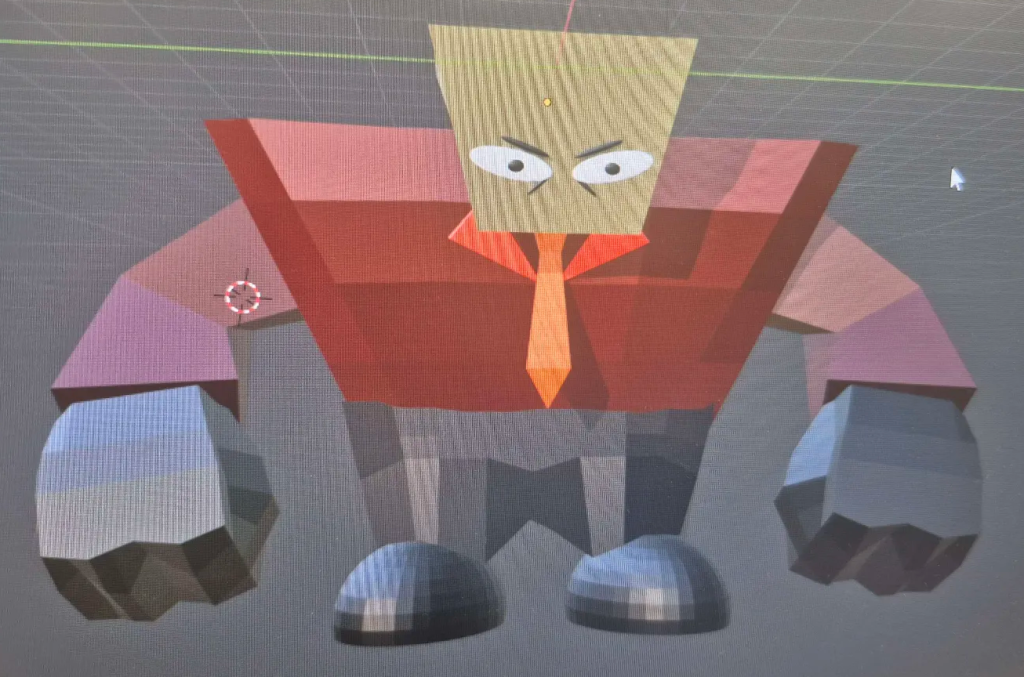
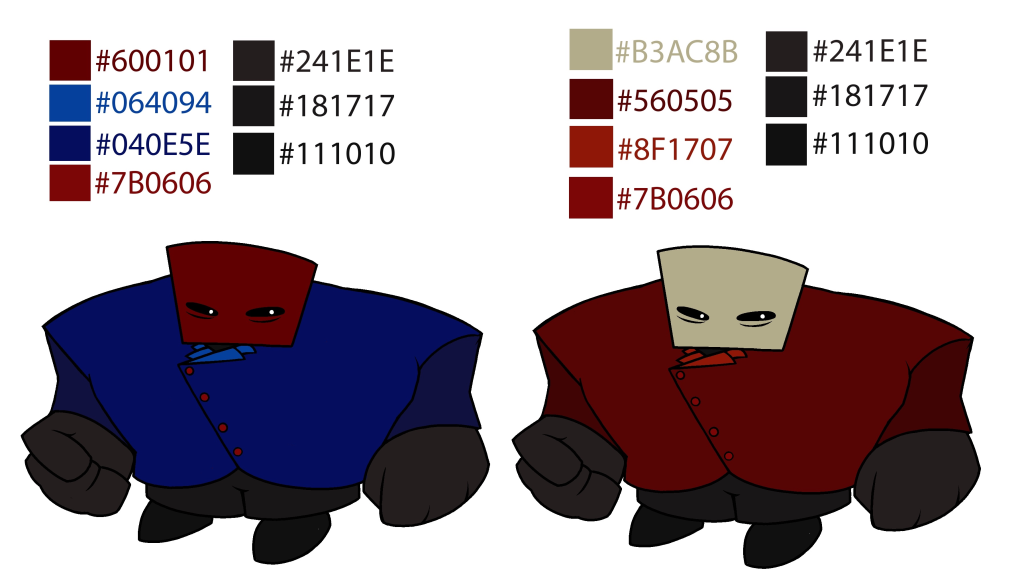
To finish it off, a colour scheme needed to be decided on. After checking what both looked like in 3D, I decided on the red and yellow design. In the Blue design, multiple colours were blended together in the shading, leading to an unsatisfying look compared to the red and yellow colour scheme being more eye catching.
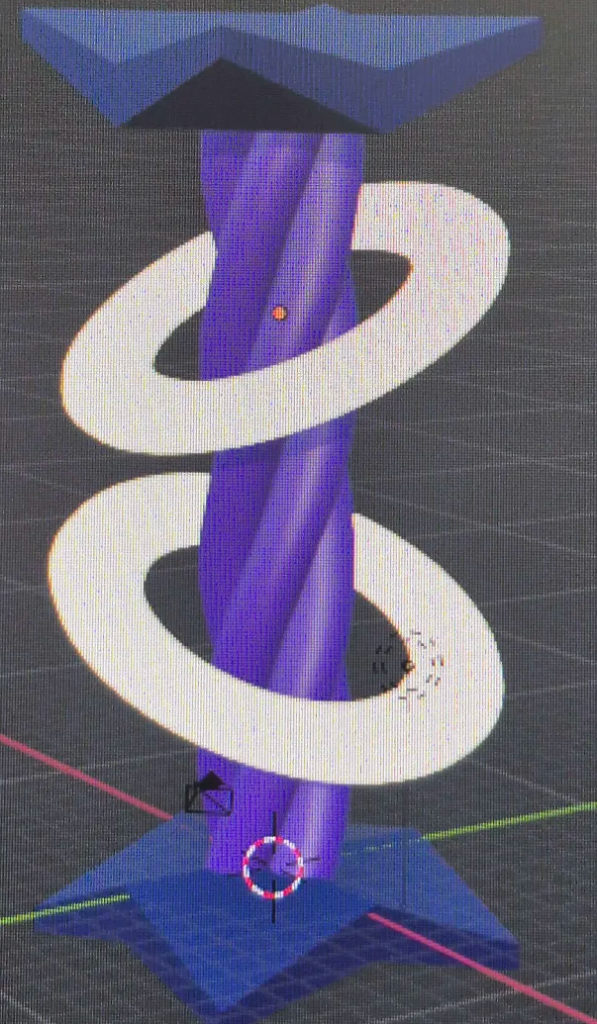
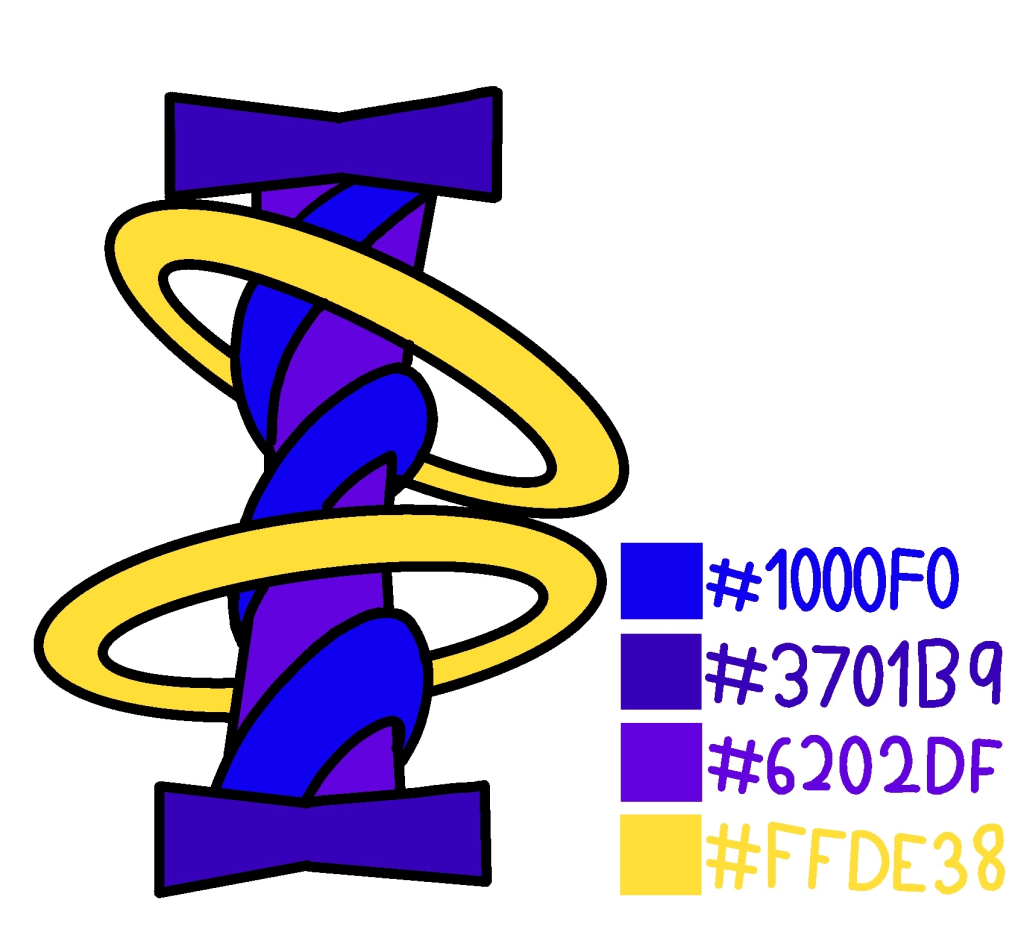
Trasnlating the pillar design across to Blender was harder thanks to the more complex shape, yet it was not impossible. After researching on the internet, and watching tutorials on YouTube, I found out how to replicate the twisting, rope-like look I wanted to achieve with the pillars. The unfortunate downside was that only one colour could be used on the middle section. This isn’t the worst outcome however as I believe it works well in 3D. Along with this, the top and the bottom still create that balance of blue and purple colouring in the sketch.
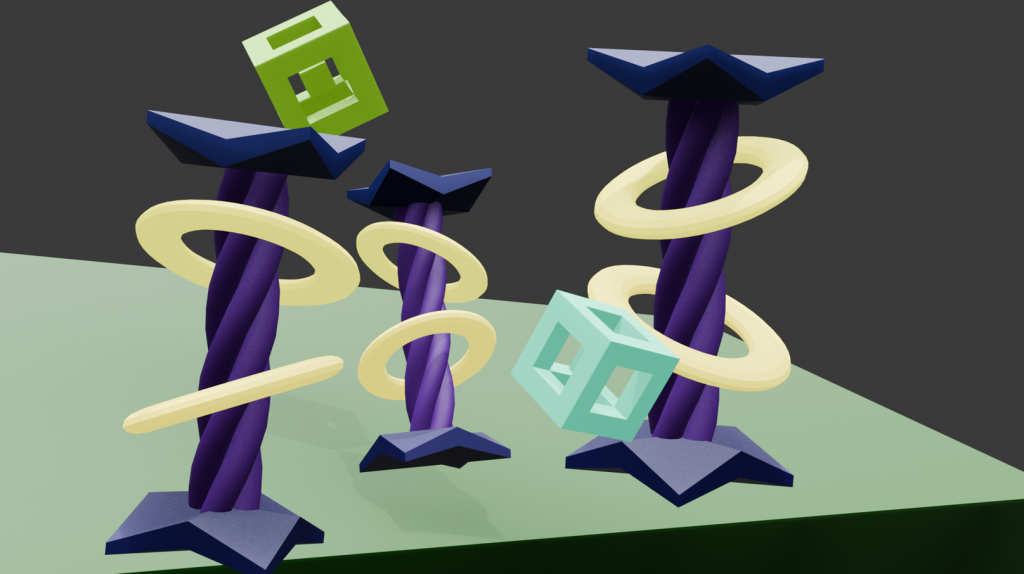
After finishing the pillar design, I duplicated it along with changing the sizes of each to see what they would look like in a hypothetical 3D area. In order to emulate this, I created a block, sized it up and then angled it towards the camera, creating the illusion of a small landscape. To help create the feel of what I wanted, I created some 3D shapes. I hoped this would get across the surreal and unique vibe I wanted to convey with the pillars. Overall, I believe the pillars work perfectly and convey exactly what I need them to.
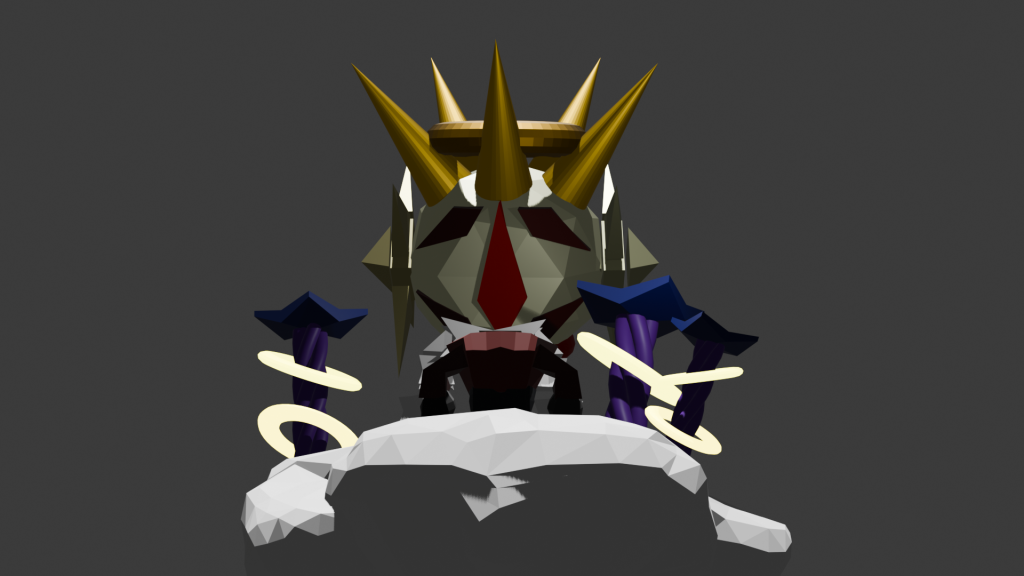
When creating the pillar and character models, I decided that one character wasn’t enough, and that I should create two to showcase my skills to the best of my ability. However, I wanted this model to showcase different skills than the last one.
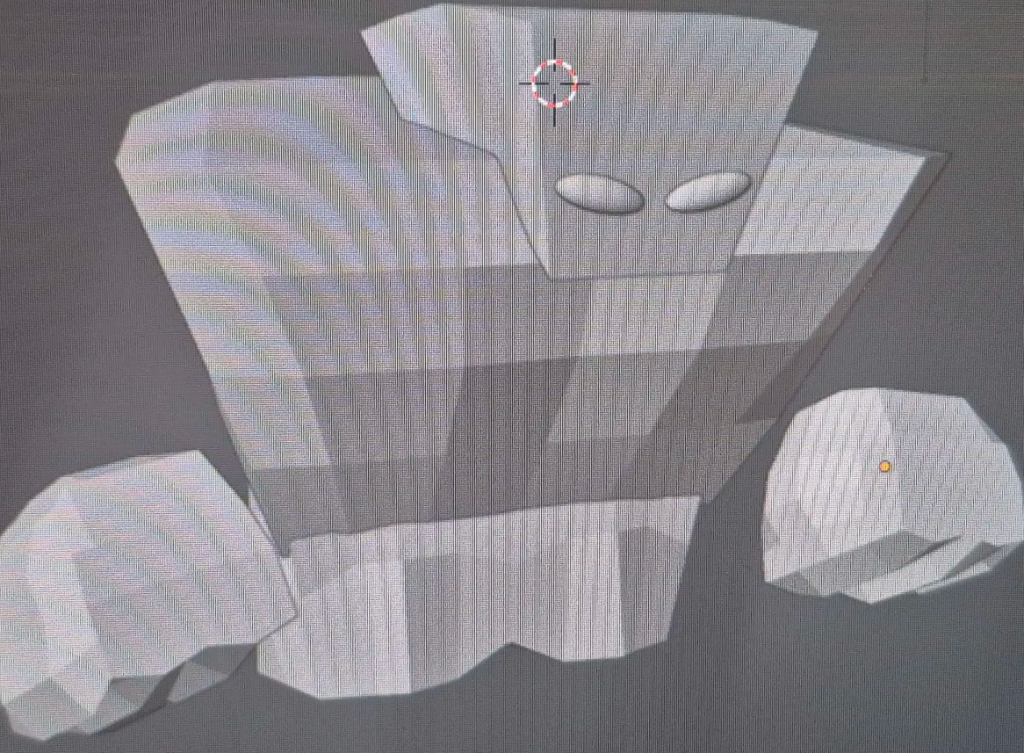
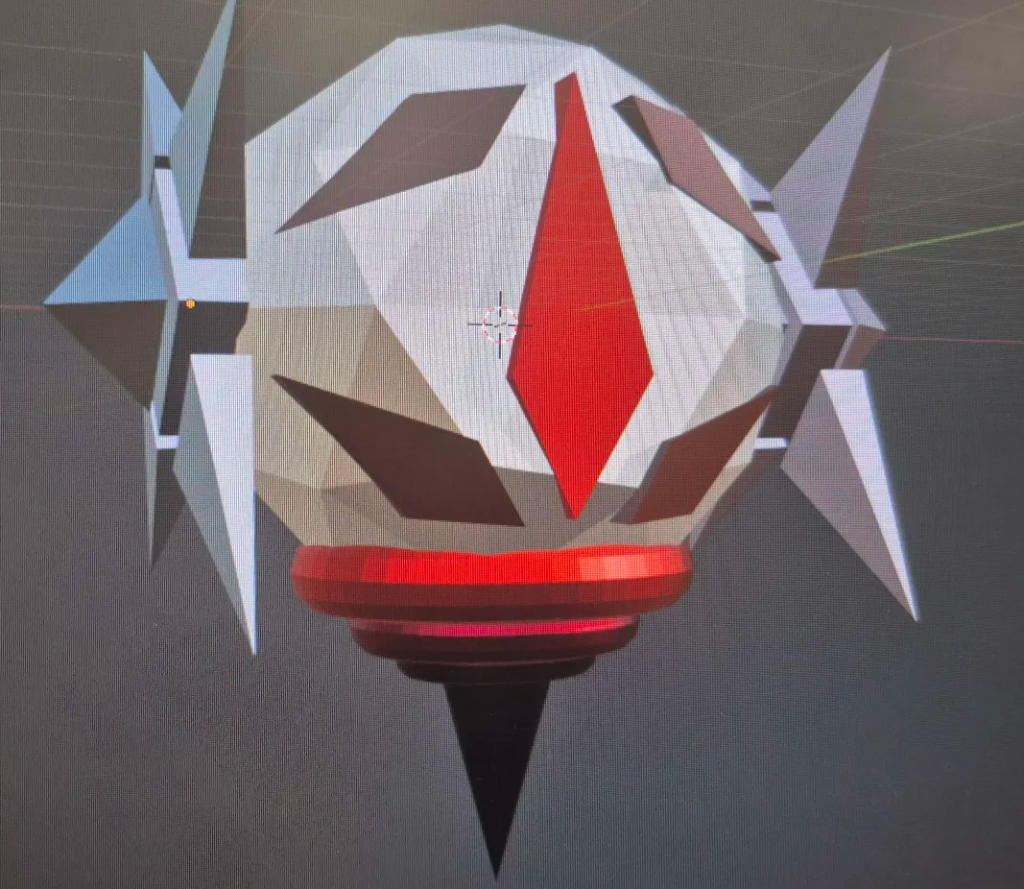
Unlike the previous model, I started editing random objects and joining them together, before eventually creating the base of the model (the circle in the middle with the side parts connected). An eyeball shape was then made from 5 shapes, as I believed it would help it look more like an actual character, rather than another set piece. From there, I added the bottom parts as I believed it looked quite baren compared to the rest of the design. As all the elements combined, I started to see potential in the model, and it started to offer yet more possibilities. The overall result was that it had become a great design for a more robotic themed character.
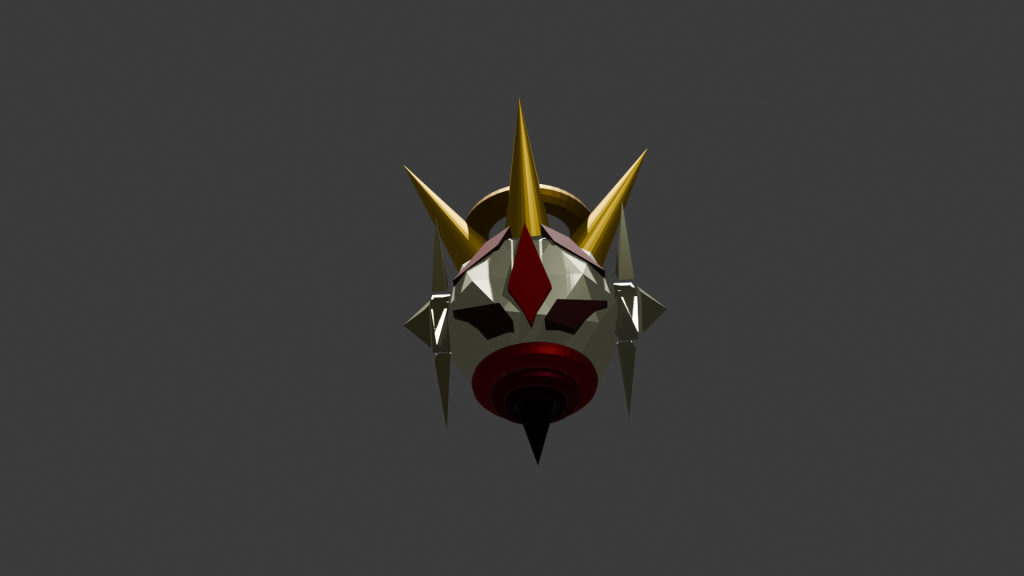
Despite everything working together, I still thought the design lacked one more thing to make it stand out. At the time, I was thinking about the novel, The King in Yellow, and wondered if similar imagery could help the deisgn. I created 5 spikes that came out of head and added a halo in the middle which connected them all, giving it the look of a crown. I believe this imagery was the last touch needed for the design and I am very pleased with the final product.
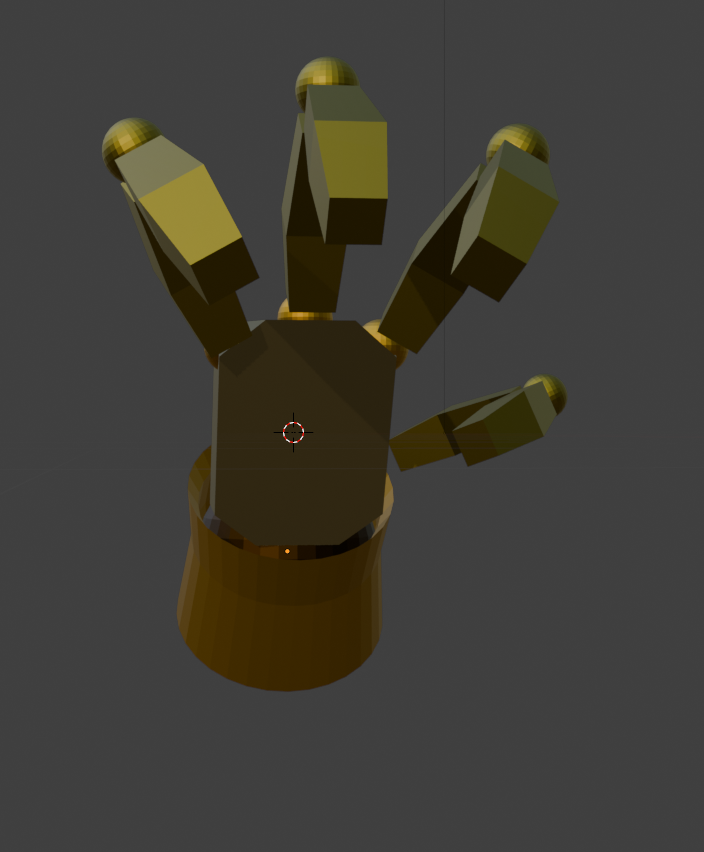
While technically not a part of the character model itself, hands were created to be next to the model. I made them for two reasons. Firstly: I believed hands would add more to the character itself and help with the style. Secondly: I believed it would help show my skills with 3D more, especially when it came to certain body parts.
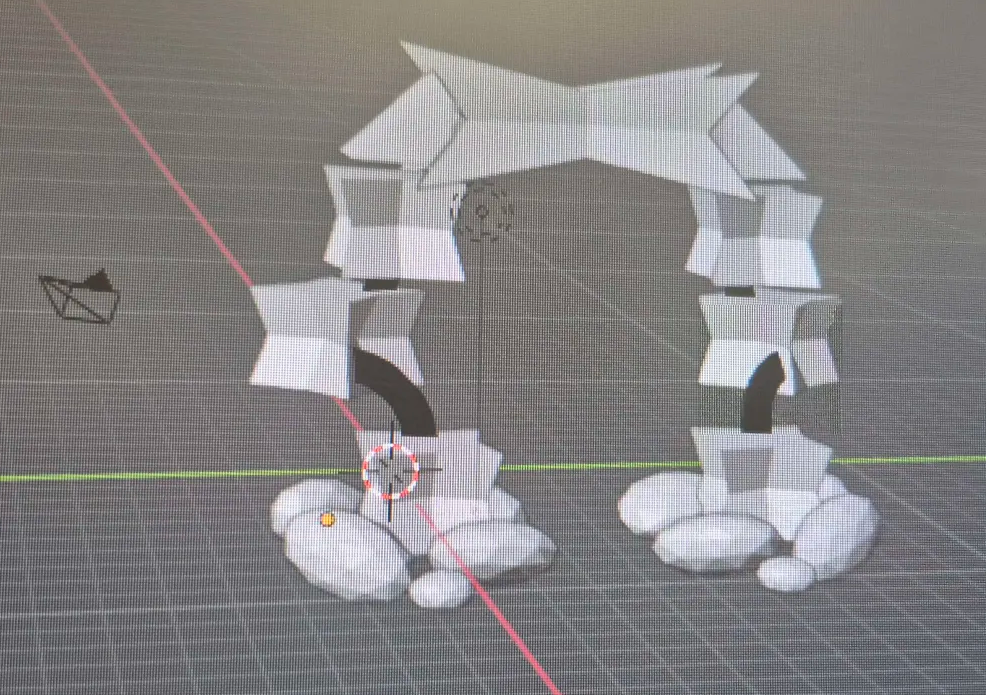
The last model I decided to make before combining everything together was a gate. Unlike traditional gates, I wanted this one to look mystical, as if a portal had been made in the frame of it. This would help the whimsical aesthetic I was going for. With this idea, I created some unqiue shapes and placed them in the shape of a door frame, along with some rocks around the base to help with the look. I then used Blender’s Grease Pencil tool to connect them all together.
Zbrush Models
Once I moved over to Zbrush, I decided to use its tools and sculpting to create the land that all the objects would be made on. I believed the sculpting tools would help me more in the intricate details that a landscape would have.
For the land, the ‘Move Topology’ tool was used on a circle to create the model. While a few other tools were used here and there, the Move Topology tool did most, if not all the work on the models. This was done by first pulling it out to create a flat surface, and then changing the size of the brush to mould the land in different areas of it. By the end of it, I had made a relatively normal but decent model for the area, along wioth two similar looking landmasses.
Once all the models in Zbrush were ported to Blender, the Decimate tool was then used to decrease the number of points on the model. This is to help avoid lag problems when exporting the model, and when rendering. Too many points on an object can lead to crashes if not handled correctly.
While Zbrush wasn’t used for many of the models, I believe I made a good use of it when it comes to the land of the area. I hope in the future, that Zbrushes tools continue to improve and make sculpting easier.
Puttings Models Together/Piecing the Land Together
At last, it was time to put all the models together. This would include not just putting all models in the same file, but changing the sizes to work together. Along with this I would start posing the camera in different spots to get an idea of how it would look in the final project.
When making it, I decided to make the robotic character overlook the entire area. While I wanted the area to be whimsical, I also quite enjoyed the overwhelming nature of having something watch over it. This is heavily inspired by another game I had been inspired by, Legend of Zelda: Majora’s Mask, which had a similar foreboding feel. While people may not be comfortable with this feeling, I believe that evoking any feeling at all is a success.
However, this first draft ended up feeling very squashed together, making it feel claustrophobic. Along with this, I still believed there could be more small models included in the vicinity to give the area life.
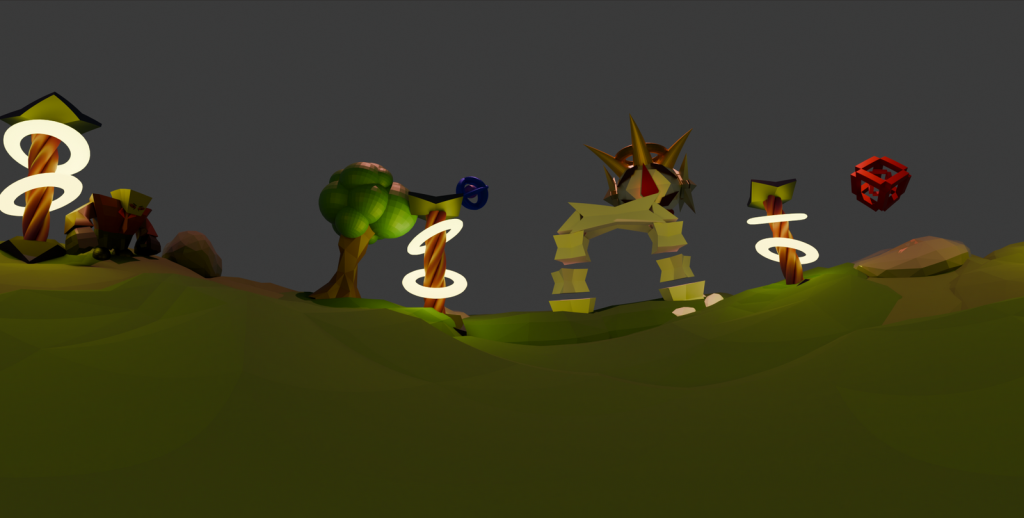
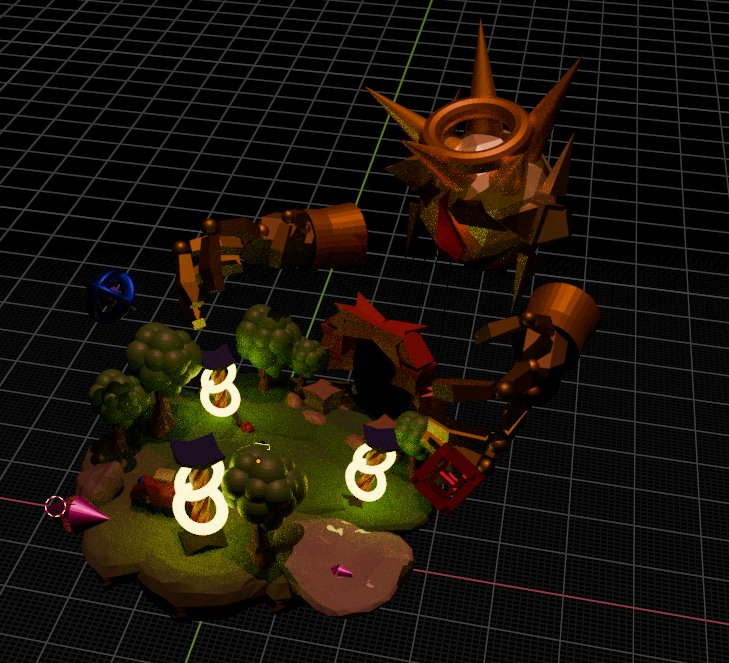
After the first attempt, I changed around the land and increased the size, giving a lot more space overall. Afterwards, I then added in all the previous models yet at a similar size to before, only scaling them up slightly. The only model that was also scaled up drastically was the mechanical character, to keep the foreboding feeling of its presence intact.
Once I had sized it all up, I started creating some extra models that would add to the look of the world. The first of these were trees. The bark of the tree was created in Zbrush with the Move Topology tool, before being imported into Blender were the Decimate tool was used to decrease the number of points on the model. From there, the leaves were made with a collection of balls, all different sizes. This helped keep the surreal feel of the world. To continue the surreal look, I then created a bunch of shapes in the sky, similar to the ones in the hypothetical pillar enviornment, though different enough to stand out. The metallic material was added onto the models to make them stand out in the sky. They were then duplicated and shrunk. These smaller duplicates were added to the ground of the area.
After this, the last two additions were made. The hands for the mechanical character were added and sized up to match the head. This made it much more intimidating. Lastly, a small, flat, black orb was added to the frame of the gate, emulating the look of a portal. This would be expanded upon in OpenBrush with effects.
From here, a 360 camera was added to get an idea of what it looked like from the ground of the area. Overall, I believe it came out better than anticipated, and there were still effects to be added in OpenBrush.
OpenBrush Efffects/Additions
After putting all the models together and making it into one overall model, it was then exported as an obj file. From there, it was put into Openbrush by connecting the vr and pc, transferring the file into the Openbrush folders. The file could then be opened, and the model could be resized.
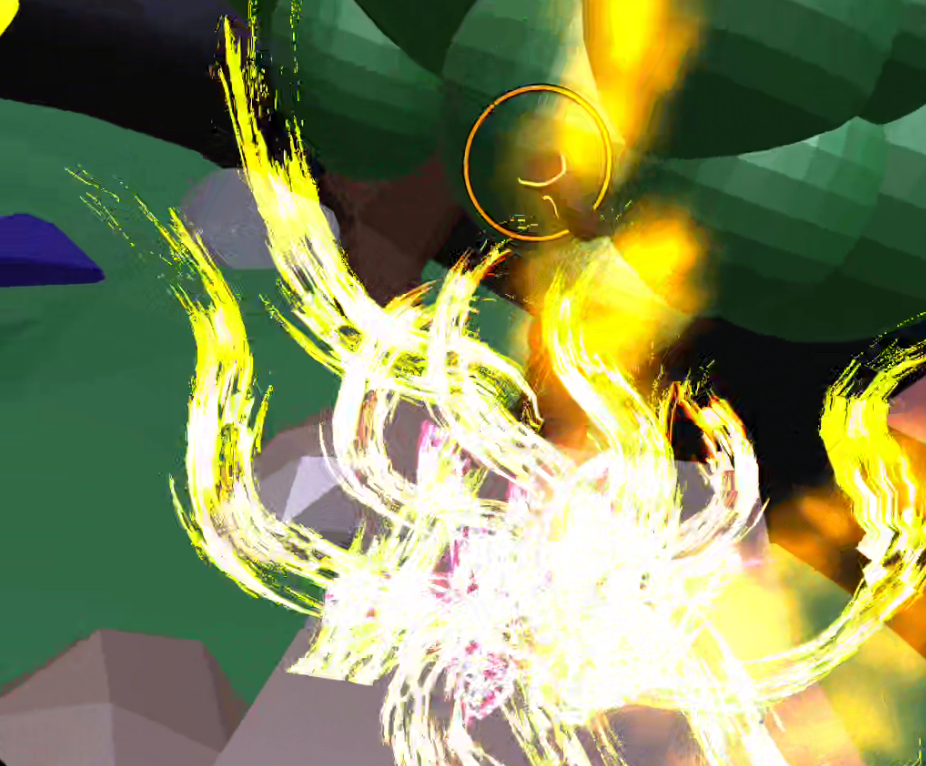
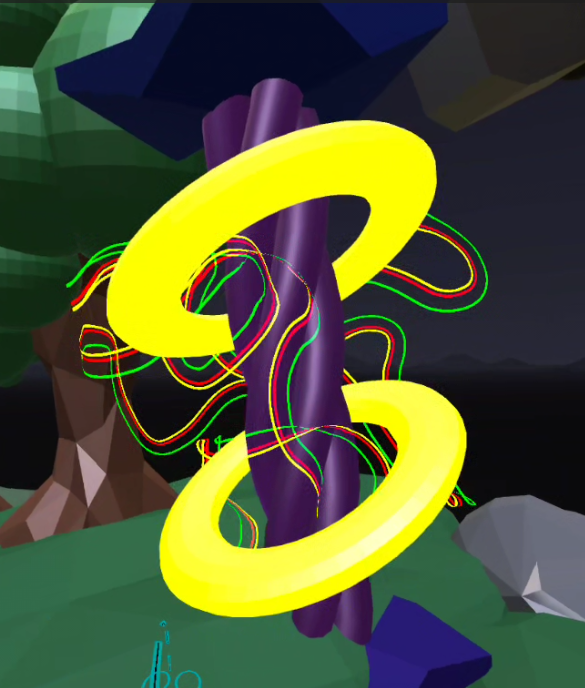
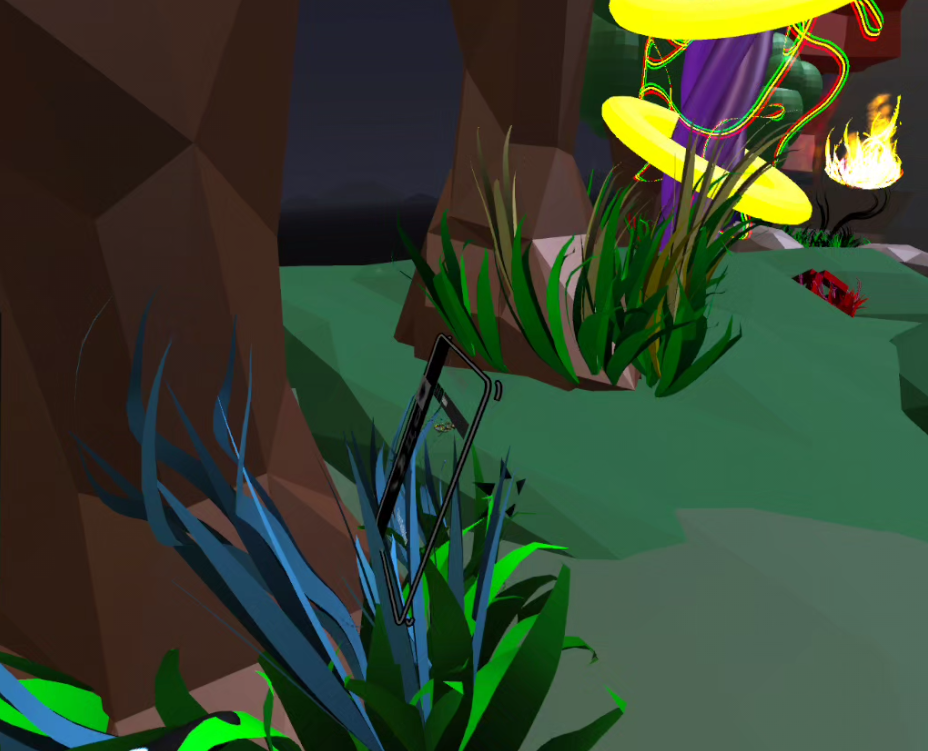
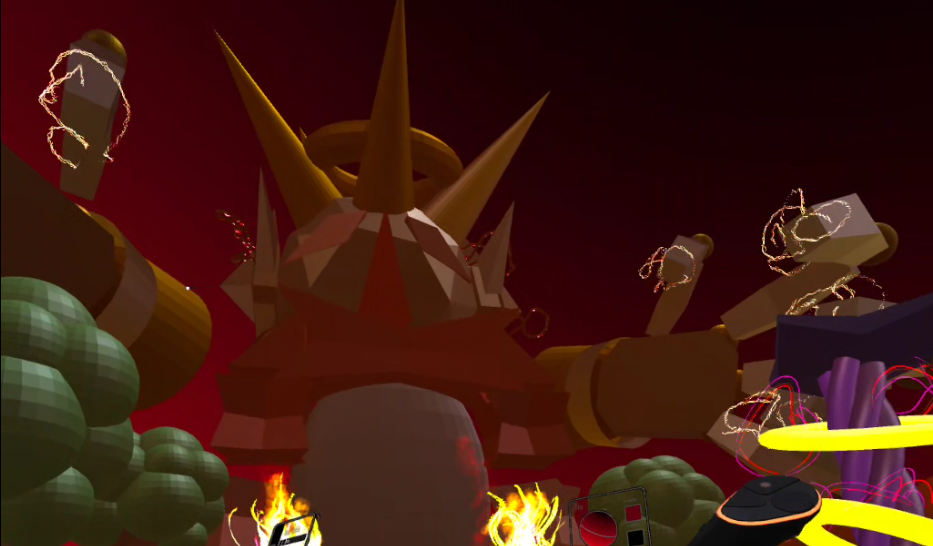
The last step of the project was to add multiple effects to the area. This would include multiple different brushes from Openbrush, including the Rainbow, Petal, Lightning, Disco, Fire and Smoke brush, among many others. These would be added on different parts that fit the theme. For example: The lightning was added to the hands of the mechanical character, the petals were made around the trees and in open spots of the model, and the fire was made in front of the gate.
After changing the background to match the aesthetic of the area, the model was finished. This resulted in a very immersive and satisying area, which mixed together multiple different programs. And because of it being a broad subject, I have been able to avoid ethical concerns in this work. I am very pleased with the final piece.
Area lookaround
Portfolio/Production Piece Narrated Video
References
Wood, P-A, (2025), ‘Purple: A Colour of Mystery, Majesty, and Transformation’, Elegant Rebel, 20th April, Available at: https://www.elegantrebelponders.com/post/purple-a-colour-of-mystery-majesty-and-transformation (Accessed on 21/12/2025)
Chambers, R.W. (1895). The King in Yellow, United States
Legend of Zelda: Majora’s Mask, (2000), Nintendo 64 [Game], Japan: Nintendo